


Is blogging for you?

You have a topic you can write about
As well as writing because you enjoy it, you also need something to write about. If you have hobbies and passions in life, then you are likely to have plenty to talk about in your blog.
You have sufficient time
Blogging along with social networking can take considerable time. You can skimp on time by blogging say, once a month and avoid doing lots of social networking but this will affect the popularity and traffic of your blog.
For instance, I personally find time my biggest hurdle for this blog. So I do a once a month posting on average and I do hardly any social networking. Fortunately, I still get considerable traffic every day due to the popularity of my blog with search engines. Yet I am aware that if I spent more time on this blog, it would be a lot more successful than it is now.
You are not intimidated by technology
There are many blogging tools available these days so that you can easily avoid anything really technical. However, not being intimated by technology will help your blog immensely with the design aspects, putting keywords into your blog and so on.
You have thick skin
You need thick skin when you write a blog for two different reasons.
The first reason to have thick skin is to be able to handle criticisms. Sometimes criticisms may be welcome constructive comments but at other times, criticisms may be unfair or unwarranted.
The second reason to have thick skin is that it usually takes time to build up a successful blog. Therefore you need to have thick skin to not care whether your blog is popular or not.
You want to make a little money
I very much doubt that many people will be able to give up the day job through blogging alone. However, by using adsense and affiliates you can at least earn that little bit extra.
You want to make your brand better known
A blog can promote your brand on-line.
For instance, I utilise this blog for a number of reasons and one of these is to aid in attracting potential clients by providing a background of my brand. This seems to work very well for me.
You have emotive reasons for blogging
There are myriad emotive reasons for blogging such as to voice your opinions, to help find like-minded people, to help people and so on.
Personally, I really enjoy the idea of some of my postings helping someone somewhere. It makes blogging definitely worth it.


 Contact Us Button Is Used To Take Attention Of Visitor. First You Need To Create
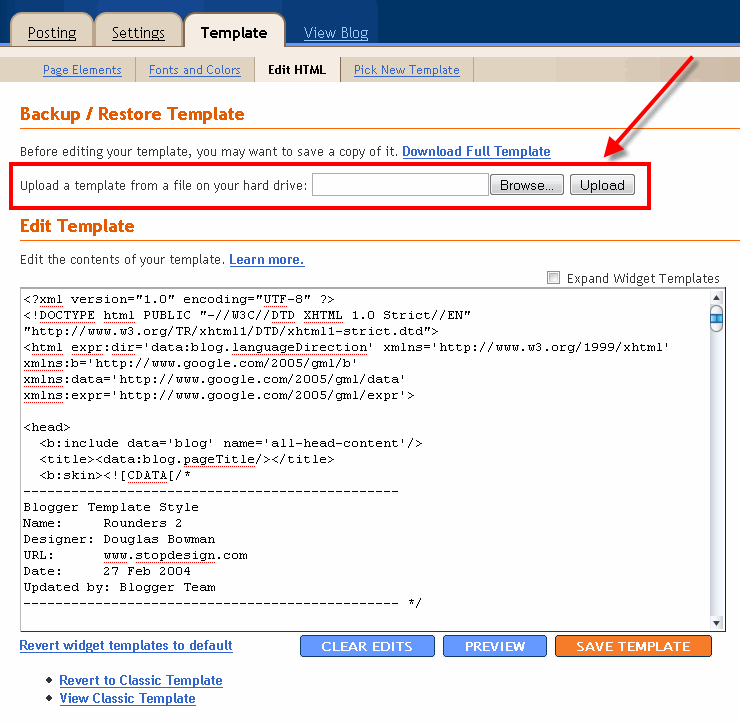
  This article was written to provide a step-by-step guide on how to correctly apply a new xml Blogger template to your blog. This process can be tricky depending on several factors (quality of the code in the new template, your existing widgets, etc) so you need to be careful when changing your template. Don’t worry though, just follow our step-by-step instructions below and we’ll hopefully get you through it without much pain.
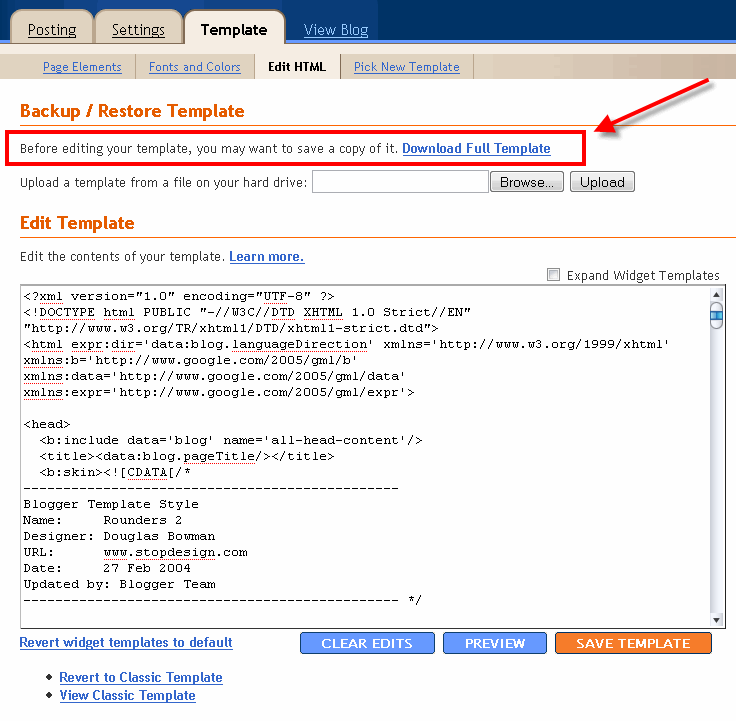

 Make sure you have backed up your template before installing a new one.


